Tampilkan postingan dengan label graphic. Tampilkan semua postingan

Senin, 30 Mei 2016

How To Become A Graphic Designer

graphic designer
How To Be A Graphic Designer

Graphic designers produce visual design solutions using images and lettering to get across information and communicate a message with high visual impact. Graphic design solutions are required for a wide variety of products and publications, such as websites, advertising, books, magazines, posters, brochures, booklets, magazines, computer games, product packaging, exhibitions and displays, logos, business cards and more. Graphic designers are normally based in a studio or office, but may also spend some time visiting and receiving clients and dealing with printers.

A graphic designer normally works to a brief (set of instructions) set by the client. They develop creative ideas and concepts choosing the appropriate media and style to meet the client's requirements. Graphic design requires creativity, knowledge of industry standard design software and a practiced approach to managing time and costs and meeting deadlines.

The Skills Of A Graphic Designer


A graphic designer may often manage more than one design brief at a time and must allocate the relevant amount of time according to the value of the job. The typical activities of a graphic designer are listed below, use the links to access additional information about an activity.
  • Meeting clients to discuss the business objectives and requirements of the job.
  • Interpreting the client's needs and developing a concept to suit their purpose.
  • Estimating the time required to complete the work and providing quotes for clients.
  • Developing design briefs by gathering information and data through research.
  • Thinking creatively and brainstorming to produce new ideas and concepts.
  • Developing ideas through drawing and sketching.
  • 'Pitching' ideas to managers or clients.
  • Working with a wide range of multimedia, like Photoshop, to produce quality designs.
  • Proofreading all work to ensure accurate and high-quality work.
  • Presenting finalised ideas and concepts to clients.
  • Keeping up to date with emerging technologies in new media as most graphic design work is now completed on a computer.
  • Working as part of a team with printers, copywriters, photographers, other designers, web developers and marketing specialists.

Graphic Designer Career Path

graphic designer career path

Graphic designers are normally employed based on the strength of their skills as opposed to their qualifications. However, most professional graphic designers have an ordinary degree or honours degree in graphic design, art or other creative, design based area.

Talent and contacts are the key to getting work as a designer, and you will need to keep an up-to-date portfolio of your work to show to potential employers or clients. Competition for jobs is strong and not all jobs are advertised, so it is a good idea to network and make contacts within the industry, and to approach companies and agencies directly. Unpaid work experience is an opportunity many designers take up in order to help develop their portfolios, make new contacts and impress potential employers. Joining professional bodies such as CSD and D&AD will also give you the opportunity to make contacts in the industry. It is also common practice for designers to create a website to showcase their work.

There is no upper age limit for entry to this occupation. You may be able to enter relevant training through universities or colleges that relax normal academic entrance requirements for suitable mature applicants. Most academic institutions define people aged 23 years or over as mature candidates.

Once a designer has completed their college studies they will still need to keep their skills up to date throughout their career. You may be able to attend short courses, for example in computer packages such as the Adobe Creative Suite, which is the industry standard package for all things design and multimedia related.


Baca selengkapnya

Kamis, 03 Maret 2016

Graphic Design Process

Graphic Design Process

The Graphic Design Process

The Graphic Design Process is a series of steps that a designer takes when working on a graphic design project. The details of each stage will differ depending on the type of design but the approach should always be the same. It is vital to stick to the process during a design as skipping a stage, completing stages out of order of not using the process at all will result in a lower quality outcome, an outcome the client is not happy with or even worse no outcome at all.

The diagram above outlines the basic stages of the graphic design process and below each stage is explained in more detail.


1. Analyse The Brief

Each design project will begin when a client delivers the designer with a brief. The brief will outline what the client wants although as the client will likely have no design experience it is important for the designer to carefully analyse all details given by the client and if necessary to make further enquiries about the needs of the client.


2. Identify Key Requirements

Based on the analysis of the brief you must identify the most important parts/key requirements. Ask yourself, what requirements must I fulfil? For example when designing a poster for an event, the simple act of including the time, date and venue are much more important than any other aspect as a poster without the necessary details is useless. It is therefore important to identify and prioritise the key requirements of the brief. The graphic design style most appropriate to the brief should also be identified at this point.


3. Research Existing Designs

Research is important to identify possible design styles and ideas which may also suit the needs of your client. These samples can be used when meeting with the client to identify the style of image/design which they prefer. For students research will also help to familiarise yourself with industry standard designs and the quality of design which is required.


4. Generate Ideas

Coming up with an idea for the design, a slogan for a campaign, an image for a poster, a name for a website etc. can be difficult. However, by focusing on fulfilling the key requirements of the brief and allowing your research to inspire you it is possible to generate original designs for your project. Brainstorming is often used where a lack of ideas is a problem. Free writing is a type of brainstorming which simply involves relaxing your mind and writing down any and all ideas you have as quickly as possible without really thinking. Having your research around you can help when doing this. It may seem very simple but generally people have numerous ideas but they tend to dismiss them before writing them down, considering them down and allowing them to be developed into viable design solutions. For help and assistance visit our article on idea generation.


5. Develop Ideas

It is good practice not to settle on simply one idea but rather to choose 2 or 3 of your best ideas and develop them through simple sketches, drawings, colour scheme test pages and font style sheets. These steps all help to develop your ideas and highlight which one has the most potential for success. Sketching will also help to identify possible layouts/compositions that can be used.


6. Produce The Design

Once an idea has been selected and sufficiently developed it is time to begin producing/creating the design. It is important to note that this is commonly the stage that overeager student designers begin at and without stating the obvious this should never be done. Depending on the type of design different softwares or materials will be used to create the design but regardless of the means of production it is important that the previous stages are not forgotten and that the key requirements are fulfilled. For help and assistance with the graphic design production stage you may find our Photoshop tutorials useful.


7. Test The Design

This is a quick and simple stage of the process but one that is often overlooked. For printed designs testing simply involves printing the design to ensure the resolution and colours are of good quality, that no clipping of important details occur and that text is readable and without errors. For website design this stage will involve checking that all features are functional, that links are working and that page loading speeds are acceptable.


8. Place The Design Insitu

For printed designs this will involve placing the poster/logo/sign/banner etc. in its intended position and ensuring that text is readable from an acceptable distant, images are clear and that the colours do not clash with or blend into their surroundings. For websites this will involve publishing the website online and rechecking all features and functions. For other types of designs, such as architecture or interior design, a programme such as Photoshop can be used to digitally place the design into its intended environment.


9. Evaluate The Design:

Before presenting your final design to the client it is vital that you evaluate it without bias. The easiest way to do this is simply return to stage 2 where you identified the key requirements of the brief and see if you have successfully fulfilled them. It may also be useful to get the opinion of others at this stage if you fear you will be unable to objectively evaluate your own design.


10. Redesign:

This step is only necessary if, after evaluation, you feel you have not successfully met the key requirements of the design brief. This stage involves returning to the beginning of the process and returning through each step correcting the errors which led to the key requirements not been fulfilled.


If you enjoyed this article then perhaps our articles on the web, interior, games or furniture design processes may also be of interest.


Baca selengkapnya

Senin, 29 Februari 2016

Magazine Cover Design Features


Magazine Cover Design Features
Magazine Cover Design Layout

Designing a Magazine Cover? Then you need to be aware of these industry standard features, Both from a technical and a design point of view. First the Technical...

TECHNICAL

Size: 

Professional Magazine Covers (and therefore magazines themselves) are not A4 in size. This is a common misconception. The actual size is similar to A4 though; 8.5 inches x 11 inches is the standard.

Text: 

Your Magazine Cover should include the magazine name, tagline and selected article headings.

Main Image: 

You should ideally use just one main image. It should be a high quality image ideally on a plain background.

Little Details:  

Don't forget the Date, Price, Issue No. and Barcode

So with all those things in place you will technically have a magazine cover, but how do you make sure it is a good one...? Now lets look at the design.

DESIGN

Main Image:

Your image should be the dominant element on the cover, it should take up at least two thirds of the cover and should contrast with the background, keeping it centrally aligned it also best. It should also utilise at least one of the Attention Grabbing Technique. The most effective being Sexy or Iconic, if you use an attractive celebrity you will be achieving both at the same time, hence the reason they adorn the cover of most magazines. When using people use either head and shoulders or waist up photos for best impact.

Magazine Cover with Iconic Celebrity
Magazine Cover Using Iconic Celebrity On The Cover
The magazine title text is best large and bold old in a sans-serif font. The style of the font should also be appropriate to the style and topic of the magazine.  

Sub-Headings are best aligned to the sides, should include a variety of font styles, colours and sizes all still in sans-serif (see the sample below), contrast with the background and use buzz words or better still any of the 12 most powerful words


Magazine Cover
Magazine Cover utilising variety of sub heading styles, colours and sizes

And not forgetting the little details: They should be kept small, discreet and out of view (unless they are a feature of the sale – e.g. special discounted price)


So if you have taken all this on board are are still interested in creating your own magazine cover design then see our create a magazine cover tutorial. You may also be interested in reading about the most powerful words in the English language, which tend to feature regularly and prominently on magazine covers.


Baca selengkapnya

Sabtu, 20 Februari 2016

Get The Right Paper Size For Your Design

ISO A Series Paper Sizes

The ISO (International Standards Organisation) 'A series' of paper sizes has become the global standard for document sizes, it based is based on the following principles:
  • A0 has an area of one square metre.
  • The height divided by the width of all formats is the square root of two (1.4142).
  • A1 is A0 cut into two equal pieces. In other words, the height of A1 is the width of A0 and the width of A1 is half the height of A0. All smaller A series formats are defined in the same way.
  • If you cut format An parallel to its shorter side into two equal pieces of paper, these will have format A(n+1).
  • The standardized height and width of the paper formats is a rounded number of millimeters.
In the ISO paper size system, the height-to-width ratio of all pages is the square root of two (1.4142 : 1). In other words, the width and the height of a page relate to each other like the side and the diagonal of a square. This aspect ratio is especially convenient for a paper size. If you put two such pages next to each other, or equivalently cut one parallel to its shorter side into two equal pieces, then the resulting page will have the same width/height ratio. This is especially useful in the creation of brochures, booklets, newsletters and magazines.
ISO B Series Paper Sizes
For publications where the ISO A series does not provide an adequate format, the B series has been introduced to cover a wider variety of paper sizes. The C series of formats has been defined for envelopes.


ISO C Series Paper Sizes
The following table shows the width and height of all ISO A and B paper formats, as well as the ISO C envelope formats. All dimensions are in millimeters (mm):

A Series FormatsB Series FormatsC Series Formats
4A01682 x 2378----
2A01189 x 1682----
A0841 x 1189B01000 x 1414C0917 x 1297
A1594 x 841B1707 x 1000C1648 x 917
A2420 x 594B2500 x 707C2458 x 648
A3297 x 420B3353 x 500C3324 x 458
A4210 x 297B4250 x 353C4229 x 324
A5148 x 210B5176 x 250C5162 x 229
A6105 x 148B6125 x 176C6114 x 162
A774 x 105B788 x 125C781 x 114
A852 x 74B862 x 88C857 x 81
A937 x 52B944 x 62C940 x 57
A1026 x 37B1031 x 44C1028 x 40

The ISO standard paper size system covers a wide range of formats, but not all of them are widely used. Among all formats, A4 is the most commonly used. Examples of common publications and the paper sizes they utilise are documented below.
The main advantage of the ISO standard paper sizes becomes evident when using copier machines. Copier machines designed for ISO paper sizes usually provide special keys for frequently needed magnification factors based on the ISO sizes, this allows the user to easliy scale the original ,up or down, to a size better suited to their needs.

Paper Size(s)Publications/Applications
A0, A1technical drawings, large posters
A1, A2flip charts
A2, A3drawings, diagrams, large tables, small posters
A4letters, magazines, forms, catalogs, laser printer and copying machine output
A5note pads
A6postcards
B5, A5, B6, A6books
C4, C5, C6envelopes for A4 letters: unfolded (C4), folded once (C5), folded twice (C6)
B4, A3newspapers, supported by most copying machines in addition to A4
B8, A8playing cards

If you found this useful you might also enjoy our article on the most common file types.


Baca selengkapnya

Kamis, 05 Maret 2015

Optimising Images For The Web

Optimising Images for the web
Optimising an image in Photoshop
In this tutorial you will learn how to change the size of an image by using the crop tool and how to optimise an image for the web in Photoshop. When an image is optimise it helps for a faster download when using the image on the web.

Step One:

In Photoshop, open up an image that you have saved by clicking on open and selecting the image you need.

Opening the image to be used in Photoshop


The image I am using the below image for the demo. I downloaded the image from google images. It is a non-copyright image,that means it’s free to use without having to pay any fees. I searched in the “Search Tools” area in google images and selected “Usage Rights” and selected “Labeled for reuse with modification”.

Selecting the usage rights on Google Images

Image used for the demo 

Image used for cropping and optimising in Photoshop

Step Two:

If you would like to get rid of any unwanted area of the image, you can crop the image. You can use the crop tool as show below to get rid of unwanted areas.

Selecting the Crop Tool in Photoshop


Appearance of the Crop Tool on Photoshop

Selection area on the image once the Crop Tool is selected in Photoshop

Step Three:

To save this image to use for the web. Click on file and the selected “saving for the web”.

Selecting  "Save for Web" in the file area on Photoshop

Step Four:

The “Save for web” window will appear. In this window, selected 4-Up, select png-24 for a faster download and for a greater number of colours of the image to be displayed when using it for on the web. 


Pop up menu to help you to select the correct format for your image to use for the web

Then you can save your image as beach_opt.png. 

Saving your optimized image 
Baca selengkapnya

Rabu, 04 Maret 2015

How to set up margins and guidelines in Photoshop

Rulers Set up in Photoshop
In this tutorial you will learn how to set up the use of Rulers in Photoshop. Rulers are use to help you to position images and text in the exact position you require when using Photoshop.


Step One:

Select file and new and create a new file. I have chosen the settings off 8.5 inches for the width, 11 inches for the height, with 300 for the resolution and RGB color for the color mode.


Setting up a new file for Photoshop

Step Two:

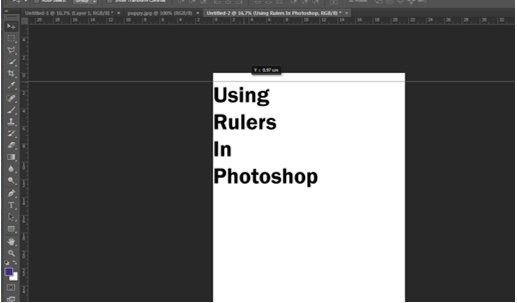
For this demo I am going use some text to show how using rulers can position your text correctly.

Sample of a new canvas for setting up the ruler example

Step Three:

To set up the rulers manually, click view and a drop down menu will appear.

View drop down menu in Photoshop

Click to turn the rulers on. A guide will then appear with numbers on the top (Horizontal) and on the left hand (Vertical) side of the page. This is your rulers guide.

Image of Rulers as the appear in Photoshop


Step Four:
Now with your mouse, hover over the numbers until a white cursor appears. Click and drag down the top line and place onto the template at desire level. Clicking and the pulling down of the rulers (Horizontal).


Adding of the Rulers (horizontal)

Bring the rulers in from the left hand size (Vertical)

Adding of Rulers (Vertical)

All the rulers in place.

All the Rulers in the correct positions

Step Five:

As you can see from the above image the text is on the outside of the rulers on the left hand side. To move the text into the correct place, select the text layer, on the right hand size and with the move tool and move into position. 

Rulers and Text in the correct position

Step Six:

You can also set up the rulers to the exact measurement required. To do this, again select view, and the drop down menu will appear, scroll down and select “New Guides”. A pop up menu will appear and you are able to select the correct measurement for the rulers by selecting either horizontal or vertical position.

Drop down menu once selected the View option on Photoshop

Pop up menu to select the correct measurements 

Selecting the measurements in the New Guide

For this demo I selected the measure for the Horizontal (top) for 3cm, with the Vertical (left side) set also at 3cm. Again for the bottom Horizontal and right side Vertical set the setting to this time 3mm for the rulers to appear.  Example show in the images below.


Creating the Horizontal Ruler with the correct measurement

New guides rulers for Horizontal and Vertical (3cm)

Horizontal and Vertical rulers appearing in Photoshop


Rulers in place after creating them with the new guide option in the view section of Photoshop. To move the text into the correct place, select the text layer, on the right hand size and with the move tool and move into position. 

Rulers and Text in the correct position on Photoshop
Baca selengkapnya