Tampilkan postingan dengan label learn Photoshop. Tampilkan semua postingan

Selasa, 19 April 2016

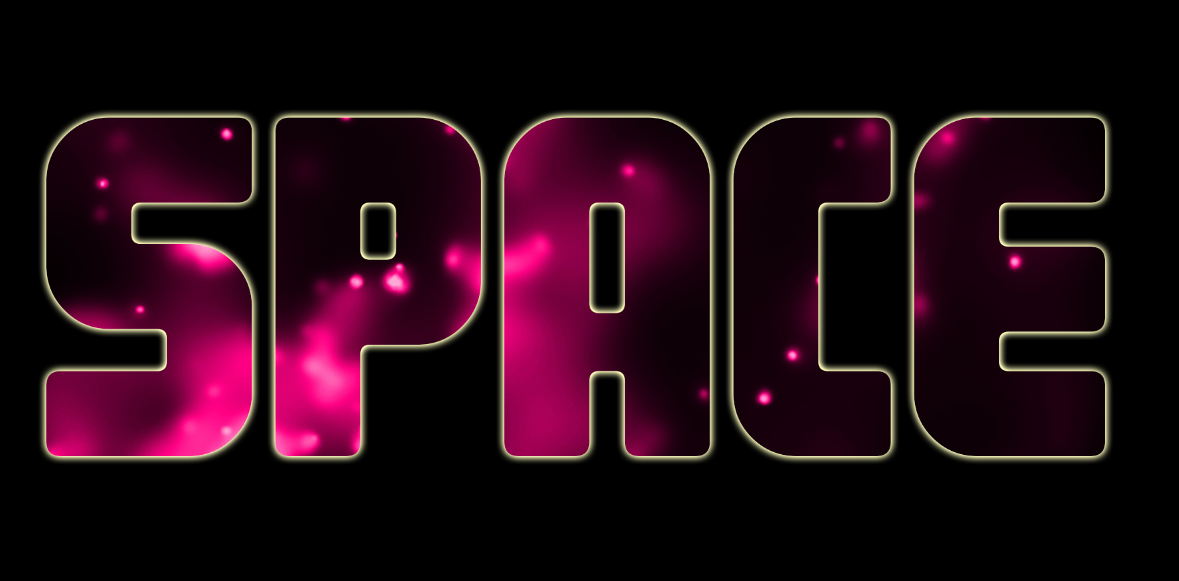
Image inside text using Photoshop

finished piece
Finished piece

Step 1.

In Photoshop pen up an image you want to be inside the text

open file in Photoshop
Open file in Photoshop


select image
Select image


Step 2.

Create a text layer and add some text to it. In this example, I have typed the word 'Space'.


Step 3.

Right click on your image layer, in my case it is 'pink_gallaxy', and select the 'create clipping mask' option from the list that appears.

create clipping mask
Create clipping mask


Step 4.

Add a background colour (if you want) and that's it, simple as that.

Completed text effect with image inside it

Tip: you can left click inside the text and drag the image around to set it up the way you want.

Baca selengkapnya

Selasa, 01 Maret 2016

Design a Movie Poster In Photoshop

Movie Poster Tutorial
completed movie poster

1. To create this horror movie poster we will be using a selection of copyright free images, as seen below. First open these files in Photoshop by going to File-> Open and navigating through your files and selecting the relevant images. 


2. For the poster, we will be using an A3 canvas, to create an A3 canvas go to File-> New and in the options window choose International Paper as the Preset and A3 as the size.

3. Next open the house image in Photoshop, unlock the layer by double clicking the lock icon on it and selecting ok, and then use the quick selection tool (or other selection tools if using older versions of Photoshop) to select the background, press backspace or delete to remove  it.

4. The use the move tool to drag and drop the house into the A3 canvas and resize and position it as shown below, using Edit-> Transform-> Scale.


5. Next open the sky image in Photoshop and drag it onto the canvas with the move tool. Put the sky on a layer beneath the house and resize and reposition it until you are happy or it resembles the image below. 

6. Next open the road image in Photoshop and crop it down as shown below.

7. Next use the quick selection tool to select and delete all areas of the image apart from the road itself, as seen in the image below.

8. Now resize the image to fit into the canvas as shown below, to do this go to Edit-> Transform-> Scale. Ensure the road is on a layer below the house and above the sky layers.


9. Select the house layer and use the clone stamp tool to clone the existing grass into the empty space between the existing grass areas and the road. To use the clone stamp tool, Alt + Click to define a source point from which to copy then click over the area you want to 'brush' it into. Be aware the source point follows you around so you will have to repeatedly redefine new source point. Don't get too particular about it though as there will be multiple layers overlaid on top of the grass very soon, so just aim to achieve a basic coverage of the empty space.


10. Now open the man image into Photoshop and as with the other image, unlock the layer, remove the background using the quick selection tool, move it into the A3 canvas and move and resize it using Edit-> Transform-> Scale.


11. Now open the fire, paper, wood and eyes images in Photoshop. We will first drag and drop the fire and paper images onto the main canvas and stretch them to fit the full canvas. Next select each layer individually and select Layer-> Layer Styles-> Blending Options. In the pop up window choose the overlay blending option for the fire and drop the opacity below 50%. For the paper choose multiply.

11. The wood image requires editing before it is blended. First it will need to be removed from its background, cropped down, moved onto the canvas and stretched to fit half the canvas. Next go to Layer-> Duplicate Layer to create a copy, go to Edit-> Transform-> Flip Horizontally and then Flip Vertically. Now position the two wood layers so they fill the entire canvas as shown below.


12. To blend the wood into the image go to Layer-> Layer Styles-> Blending Options. In the pop up window choose the overlay blending option.


13. The final image to be blended in is the eyes. As before drag and drop it onto the canvas, resize it to a size you are happy with and blend it using the multiply blending option.


14. Now we will use the paper layer to create a rough, black border around the edge of the poster. Select the paper layer and use the magic wand tool to select the white area around the paper (you may need to use the ‘add to selection’ option to get all the area selected at once. While retaining the selection move from layer to layer hitting delete or backspace to remove the content within the selection until all layers, except the background later, are completed. Then deselect (Ctrl+D shortcut) and select the background layer and use the paint bucket tool to fill it in black.


15. The final part of the image is the text. The font I have chosen is called Calame and is available for free download HERE. The title I have chosen is Abandoned but you can choose any title you like. The image below shows the Layer styles used on the text. A basic drop shadow was added and then an inner shadow was added to increase the scratched looked of the text.


16. Next additional text was added to represent the actors in the movie and quotes from reviews of the movie. I have chosen to use the same font style as the heading (Calame) but again the choice is yours. As a final touch I duplicated the paper layer and placed it above the text as the very top layer, as shown below.


17. And that it, your poster should look like the one below...

Movie Poster Tutorial
The completed Movie Poster

If you enjoyed this check out our new video tutorial on how to create a Sci-fi movie poster.


Baca selengkapnya

Senin, 29 Februari 2016

Magazine Cover Design Features


Magazine Cover Design Features
Magazine Cover Design Layout

Designing a Magazine Cover? Then you need to be aware of these industry standard features, Both from a technical and a design point of view. First the Technical...

TECHNICAL

Size: 

Professional Magazine Covers (and therefore magazines themselves) are not A4 in size. This is a common misconception. The actual size is similar to A4 though; 8.5 inches x 11 inches is the standard.

Text: 

Your Magazine Cover should include the magazine name, tagline and selected article headings.

Main Image: 

You should ideally use just one main image. It should be a high quality image ideally on a plain background.

Little Details:  

Don't forget the Date, Price, Issue No. and Barcode

So with all those things in place you will technically have a magazine cover, but how do you make sure it is a good one...? Now lets look at the design.

DESIGN

Main Image:

Your image should be the dominant element on the cover, it should take up at least two thirds of the cover and should contrast with the background, keeping it centrally aligned it also best. It should also utilise at least one of the Attention Grabbing Technique. The most effective being Sexy or Iconic, if you use an attractive celebrity you will be achieving both at the same time, hence the reason they adorn the cover of most magazines. When using people use either head and shoulders or waist up photos for best impact.

Magazine Cover with Iconic Celebrity
Magazine Cover Using Iconic Celebrity On The Cover
The magazine title text is best large and bold old in a sans-serif font. The style of the font should also be appropriate to the style and topic of the magazine.  

Sub-Headings are best aligned to the sides, should include a variety of font styles, colours and sizes all still in sans-serif (see the sample below), contrast with the background and use buzz words or better still any of the 12 most powerful words


Magazine Cover
Magazine Cover utilising variety of sub heading styles, colours and sizes

And not forgetting the little details: They should be kept small, discreet and out of view (unless they are a feature of the sale – e.g. special discounted price)


So if you have taken all this on board are are still interested in creating your own magazine cover design then see our create a magazine cover tutorial. You may also be interested in reading about the most powerful words in the English language, which tend to feature regularly and prominently on magazine covers.


Baca selengkapnya

Jumat, 22 Januari 2016

Photoshop: Lasso Tool

Photoshop: Lasso Tool

Step 1: 

You can find the Lasso Tool, third from the top in the single column tool bar.


Or if your tool bar is in double column layout, second from the top, on the left.

Step 2:

Right click on the lasso tool and make sure the top tool in the sub menu is selected. Also you can select the Lasso tool by pressing the ‘L’ key in Photoshop.

Step 3

The basic premise of the lasso tool is to left click and hold on the screen and move the lasso line around the outline of the area you want to select. It’s usually good practice when learning the lasso tool to choose items or objects with a definite outline. Fuzzy and obscure furry objects can prove problematic. Take for example, this cup of coffee…


Pick any point on the outline of the saucer of the cup and move the cursor gradually around the object, holding the left mouse button through out, until you are back at the point of initiation. It is important to fully enclose the desired area with the lasso tool, if you do not complete the shape, Photoshop by default will finish the shape for you, with a straight line from where you released the left click to where it was originally pressed.

Then release the left mouse button and the object will be surrounded by what is commonly known as “marching ants”. When starting to select the item a general outline of the object is sufficient, you can go in to detail later with the add and subtract methods. 

Step 4:

When you attempt the fine details it’s a generally a good idea to avail of Photoshop’s zoom tool. You can do this by using the by pressing and holding Ctrl + Space barand left clicking where you want to zoom in. You can also zoom out in a similar fashion by pressing and holding Alt + Space-bar and left clicking to move out. You can then navigate by holding the Space-bar, left clicking and dragging on the screen and therefore dragging the view around the image.

Step 5:

If you have cut in on the area you were supposed to outline, you can use the Add to Selection mode by holding down Shift and left clicking. Just like with original shape you defined, if you do not complete the shape, Photoshop will finish the shape with a straight line, and in a lot of cases you will be left with a, perhaps undesired, island of deselected image.

Step 6:

Likewise if you have gone too far away from the outline and you need to remove some of the Lassoed image you can use the subtract key, by pressing down the Alt and holding down Alt. Again if you do not complete the shape Photoshop will complete it for you with a straight line possibly giving you an isolated island of selected image.

Step 7: 

After you have defined the shape you want, press and hold Ctrl + Shift + I to inverse the selection. Then left click on the Image, then click Adjustments. 

Step 8:

Once in the Adjustment sub-menu click Hue/Saturation. Then bring the Saturation down to 0, or the toggle bar all the way to the left. 

Step 9: 

Enjoy.

Photoshop: Lasso Tool


Baca selengkapnya

Kamis, 21 Januari 2016

Photoshop: Quick Selection Tool


Before & After

Step 1: 

Select the quick select tool. If your tool bar is in the single column it can be found fourth tool from the top, or alternatively press w key on the keyboard.


Step 2: 

Then simply left click inside the part of the image you are trying to define. You can re-size the Quick Selection Tool cursor by pressing the left bracket key [ to make the cursor smaller or right bracket key ] to make it bigger.

Step 3: 

To start, it's best just to make a simple outline and then work in the details later.


Step 4:

 If you want to deselect a certain area, you can by pressing and holding down Alt and left clicking on the area you want to deselect. Or alternatively by clicking the Subtract from selection mode in the toolbar. But by default the Quick selection tool is in the Add to selection mode. 


Step 5: 

 For the areas you can see through the windows you will need to use the Subtract from selection mode.

Step 6: 

Manipulate your image as you please, in this case we're going to press Shift + Ctrl + I  to select the inverse of the selected shape, in other words deselect the area that is and select the area that isn't. Then left click on the Image, then Adjustments. 


Step 7:

Once in the Adjustment sub-menu click Hue/Saturation. Then bring the Saturation down to 0, or the toggle bar all the way to the left. 


....And finally, the final results. 


Baca selengkapnya