Tampilkan postingan dengan label design_teacher. Tampilkan semua postingan

Kamis, 05 Maret 2015

Lighting in blender


Lighting in blender
finished lighting result

What is Lighting?

Lighting is a very important topic in rendering, standing equal to modelling, materials and textures. The most accurately modelled and textured scene will yield poor results without a proper lighting scheme, while a simple model can become very realistic if skilfully lit.

Why would you use it? 

People use lighting in order to make their object more realistic and easier to see. It also makes your object better looking in general. You also need lighting in your scene if you wish to create a rendered video or image.


Different types of lighting

Point light:

1. In order to do this you must press shift + A and select lamp then select point then place this light somewhere on your scene

table with a point lamp
point lamp

Sun light:

1. Repeat the same process that you did for point but this time select sun, you should try place this light up high and at an angle to your object in order to get a good effect

table with a sun lamp
sun lamp


Spot light:


1. Again, repeat the same process except select spot, you should place this above your object in order to get the desired effect. This light emits light in a cone like direction

table with a spot lamp
spot lamp


Hemi light:

1. Same again, repeat the process and select hemi. This is a 180® directional light which emits light downwards

table with a hemi lamp
hemi lamp


Area light:

1. Same steps again just select area instead. This is an upward light that emits light from the plane.

table with an area lamp
area lamp

How to effectively light an object in blender

1. Press F12 for camera perspective


camera perspective of human head
camera perspective


2. Then open up the world tab and tick ambient occlusion


world tab in blender
world tab

3. Turn ambient occlusion to full


full ambient occlusion


4. Reduce ambient occlusion to 0.5

ambient occlusion 0.5
half ambient occlusion


5. Go to the Gather column in World tab

gather in blender
gather column
6.  Adjust samples to preferred amount of samples. This makes the picture more realistic but my recommendation is not to go over 10 as it may crash your computer


samples - human head
samples human head
sample at 10
gather sample 10
7. Press 7 for top view


top view of human head
top view


8. Then duplicate the lamp by pressing Shift + D and place lamps at the front, the back, and the side


3 point lamp of human head
3 point lamp


9.  Then adjust the energy on both duplicate lamps. To do this you have to go to the object data tab and adjust the energy settings

energy settings in blender
energy settings
10. Set the lamp behind the object to 0.8 and the one beside it to 0.5


closer view of energy settings
energy settings 2
11. Once this is done press F12 and that is the lighting of the object done.


finished image of lighting
finished lighting
Baca selengkapnya

Rabu, 04 Maret 2015

How to set up margins and guidelines in Photoshop

Rulers Set up in Photoshop
In this tutorial you will learn how to set up the use of Rulers in Photoshop. Rulers are use to help you to position images and text in the exact position you require when using Photoshop.


Step One:

Select file and new and create a new file. I have chosen the settings off 8.5 inches for the width, 11 inches for the height, with 300 for the resolution and RGB color for the color mode.


Setting up a new file for Photoshop

Step Two:

For this demo I am going use some text to show how using rulers can position your text correctly.

Sample of a new canvas for setting up the ruler example

Step Three:

To set up the rulers manually, click view and a drop down menu will appear.

View drop down menu in Photoshop

Click to turn the rulers on. A guide will then appear with numbers on the top (Horizontal) and on the left hand (Vertical) side of the page. This is your rulers guide.

Image of Rulers as the appear in Photoshop


Step Four:
Now with your mouse, hover over the numbers until a white cursor appears. Click and drag down the top line and place onto the template at desire level. Clicking and the pulling down of the rulers (Horizontal).
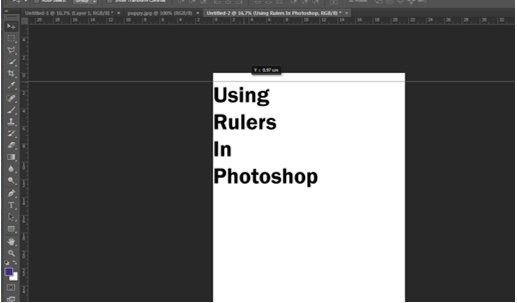

Adding of the Rulers (horizontal)

Bring the rulers in from the left hand size (Vertical)

Adding of Rulers (Vertical)

All the rulers in place.

All the Rulers in the correct positions

Step Five:

As you can see from the above image the text is on the outside of the rulers on the left hand side. To move the text into the correct place, select the text layer, on the right hand size and with the move tool and move into position. 

Rulers and Text in the correct position

Step Six:

You can also set up the rulers to the exact measurement required. To do this, again select view, and the drop down menu will appear, scroll down and select “New Guides”. A pop up menu will appear and you are able to select the correct measurement for the rulers by selecting either horizontal or vertical position.

Drop down menu once selected the View option on Photoshop

Pop up menu to select the correct measurements 

Selecting the measurements in the New Guide

For this demo I selected the measure for the Horizontal (top) for 3cm, with the Vertical (left side) set also at 3cm. Again for the bottom Horizontal and right side Vertical set the setting to this time 3mm for the rulers to appear.  Example show in the images below.


Creating the Horizontal Ruler with the correct measurement

New guides rulers for Horizontal and Vertical (3cm)

Horizontal and Vertical rulers appearing in Photoshop


Rulers in place after creating them with the new guide option in the view section of Photoshop. To move the text into the correct place, select the text layer, on the right hand size and with the move tool and move into position. 

Rulers and Text in the correct position on Photoshop
Baca selengkapnya