Elements of Design
 |
| The Elements of Design |
The Design Elements refer to the different types of parts that can be used in the creation of any given composition or design. These elements can be combined and arranged in a variety of ways to create an endless variety of designs, both two and three dimensional. They may seem like obvious categorisations but understanding them is important to enhancing your ability to utilise them in your design projects. Each design element is discussed in detail below but for now let's quickly identify the elements of design.
The design elements are...
- Point
- Line
- Shape
- Form
- Texture
- Colour
- Value
- Space
Understanding design elements is key to creating professional designs that are both simple and stylish. Using the design elements correctly allows you to keep designs clear and minimal without looking plain or boring; it's a fine line but it is along that line that the best designs rest. Here the elements are outlined and explained, but how you use them is dependent of the principles of design that you choose to use. You should ideally follow up this article by reading about the Design Principles.
Point:
A point is a single dot or mark that has position but is otherwise limited. It is a single entity in itself and alone it can act as a focal point or a stopping point in a composition. For example a target or dart board has a single point as its focus. Together a number of points can have a leading effect where the eye naturally attempts to "connect the dots" to create a line or form. This is known as the Gestalt grouping principle.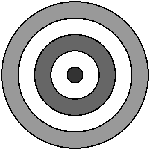 |
| design element - point |
Line:
A line is essentially a series of connected points. There are characterised by their length, direction and weight. Lines can be straight or wavy, long or short, heavy or soft, architectural or organic. As such they can be utilised in a variety of ways in a composition. They can be used to create perspective, outline a landscape, frame a composition etc. The directionality of a line will also have a big effect on your composition with oblique or slanted lines suggesting movement and dynamism while vertical or horizontal lines suggest structure, balance and conformity. |
| design element - line |
 |
| design element - line weight |
Shape:
Shapes are essentially closed lines. Shapes are two dimensional and forms are three dimensional. The basic two dimensional shapes are squares, rectangles and triangles with the related three dimensional forms being cubes, bricks (technical name is a rectangular prism) and pyramids. An infinite amount of other shapes exist of course, whether they are fluid organic shapes or rigid abstract shapes. |
| design element - shape (fluid) |
 |
| design element - shape (2d) |
Form:
Forms are essentially three dimensional shapes. The basic two dimensional shapes are squares, rectangles and triangles with the related three dimensional forms being cubes, bricks (technical name is a rectangular prism) and pyramids. An infinite amount of other forms exist of course, whether they are fluid organic forms or rigid abstract geometric forms.
* You should ideally follow up this article by reading about the Design Principles.
 |
| design element - shape (3d) |
Texture:
Texture is the appearance of a surface material. The main differentiation between textures is that it is either rough or smooth. Textures suggest what a form/shape is made of and can be created using points, line, shapes or colour. Unlike the other elements, texture is both a visual and tactile element. |
| design element - texture (rough) |
 |
| design element - texture (smooth) |
Colour and Value:
Colour, also called hue, is how the eye perceives reflected light. There are many different theories about colour which are covered in more depth in the section on colour theory. What I will explain here are the three main components of a colour: hue, value and saturation. |
| Colour properties |
- Hue is where a colour is positioned on the colour wheel. Technically the hue is the colour which it a design element in itself.
- Value is the darkness or lightness of a colour and is a design element in itself.
- Saturation is the intensity of a colour.
Space:
Believe it or but in a design what you don't add can be just as important as what you do. What i'm talking about is empty space. Space is mainly used to frame an item or object in a composition. By leaving space around something the viewer is better able to isolate and concentrate on it without the distraction of any other overlapping or intersecting objects. |
| space around items allows them to be 'read' more easily |
* You should ideally follow up this article by reading about the Design Principles.